Sync Apple Health Data
to Mac with Auto Sync
Prerequisites
This guide requires that you have the Health Auto Export app installed on iPhone and Mac.
Syncing data to Mac requires Premium access.
Limitations
The first time you install Health Auto Export app on Mac, you will need to follow the directions below in order to ensure data is available to be shown in the app.
While Health Auto Export aims to keep data in sync seamlessly in the background, there are two major factors that limit data sync:
Apple Health data on iPhone is encrypted when you device is locked. This means Health Auto Export is not able transfer data to the Mac application during times when your iPhone is locked.
Please note the Mac application is not reading directly loading data from Apple Health but uses data saved in iCloud Drive by Health Auto Export for iPhone.
iOS allows only limited data processing while apps are in the background. This can limit how quickly and how up-to-date data appears in the Health Auto Export Mac application. You may need manually trigger a data sync from iPhone as described below.
Sync Data From iPhone
Navigate to Auto Sync
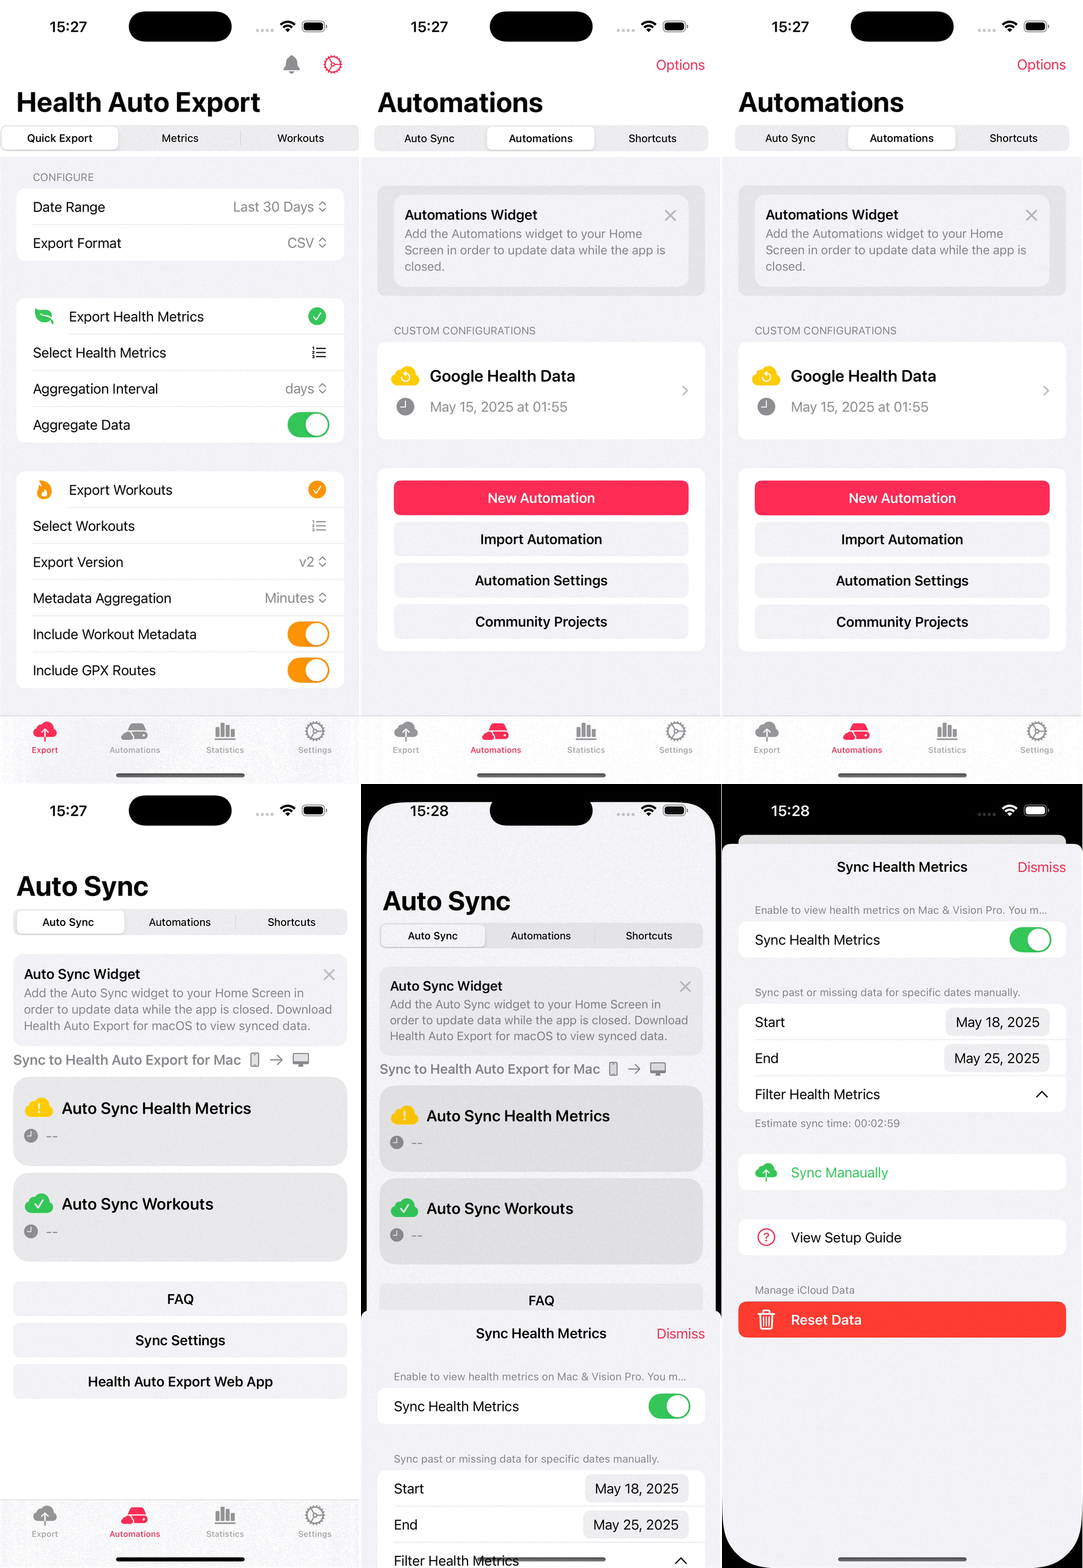
In Health Auto Export for iPhone, navigate to the Auto Sync screen as shown.
Select Automations on the bottom tab bar.
Select Auto Sync in the top bar.
Here you’ll see options:
Auto Sync Health Metrics for syncing health metrics to Mac
Auto Sync Workouts for syncing Workouts to Mac
FAQs about Auto Sync
Auto Sync Settings
Web app: you can run Health Auto Export as a web application instead of using the Mac application.
Sync Data Manually
Select Auto Sync Health Metrics or Auto Sync Workouts to sync data for health metrics and workouts respectively.
Date Range: select a start and end date for data to transfer
There is no limit to how much data you can transfer, however, the more data you sync, the longer it will take. Consider using smaller date ranges initially rather than attempting to sync all your data at once.
When manually syncing Health Metrics, use the “Filter Health Metrics” option to specify which data is transferred at runtime. Each selected metric will add to the total time it takes to complete a transfer.
Sync Manually: start saving data to iCloud Drive
You must be signed into your iCloud account and have iCloud Drive enabled
Add the Auto Sync widget to your iPhone Home Screen in order as shown below to assist with background syncing to Mac.
How to Use the Auto Sync Widget
Add the Auto Sync widget to your Home Screen in order to run sync data while Health Auto Export is in the background.
Follow Apple’s instructions for adding widgets to the Home Screen. In the widget menu, search for “Auto Export.”
Swipe to the “Auto Sync” widget type. Tap on the widget to add it to your Home Screen.
When the widget updates, new data is synced to your Mac.
View Data on Mac
Once you’ve installed and set up Health Auto Export on iPhone as outlined above, follow these steps to ensure data shows consistently in the macOS application.
Health Auto Export for Mac will use the data stored in iCloud Drive by the iPhone app.
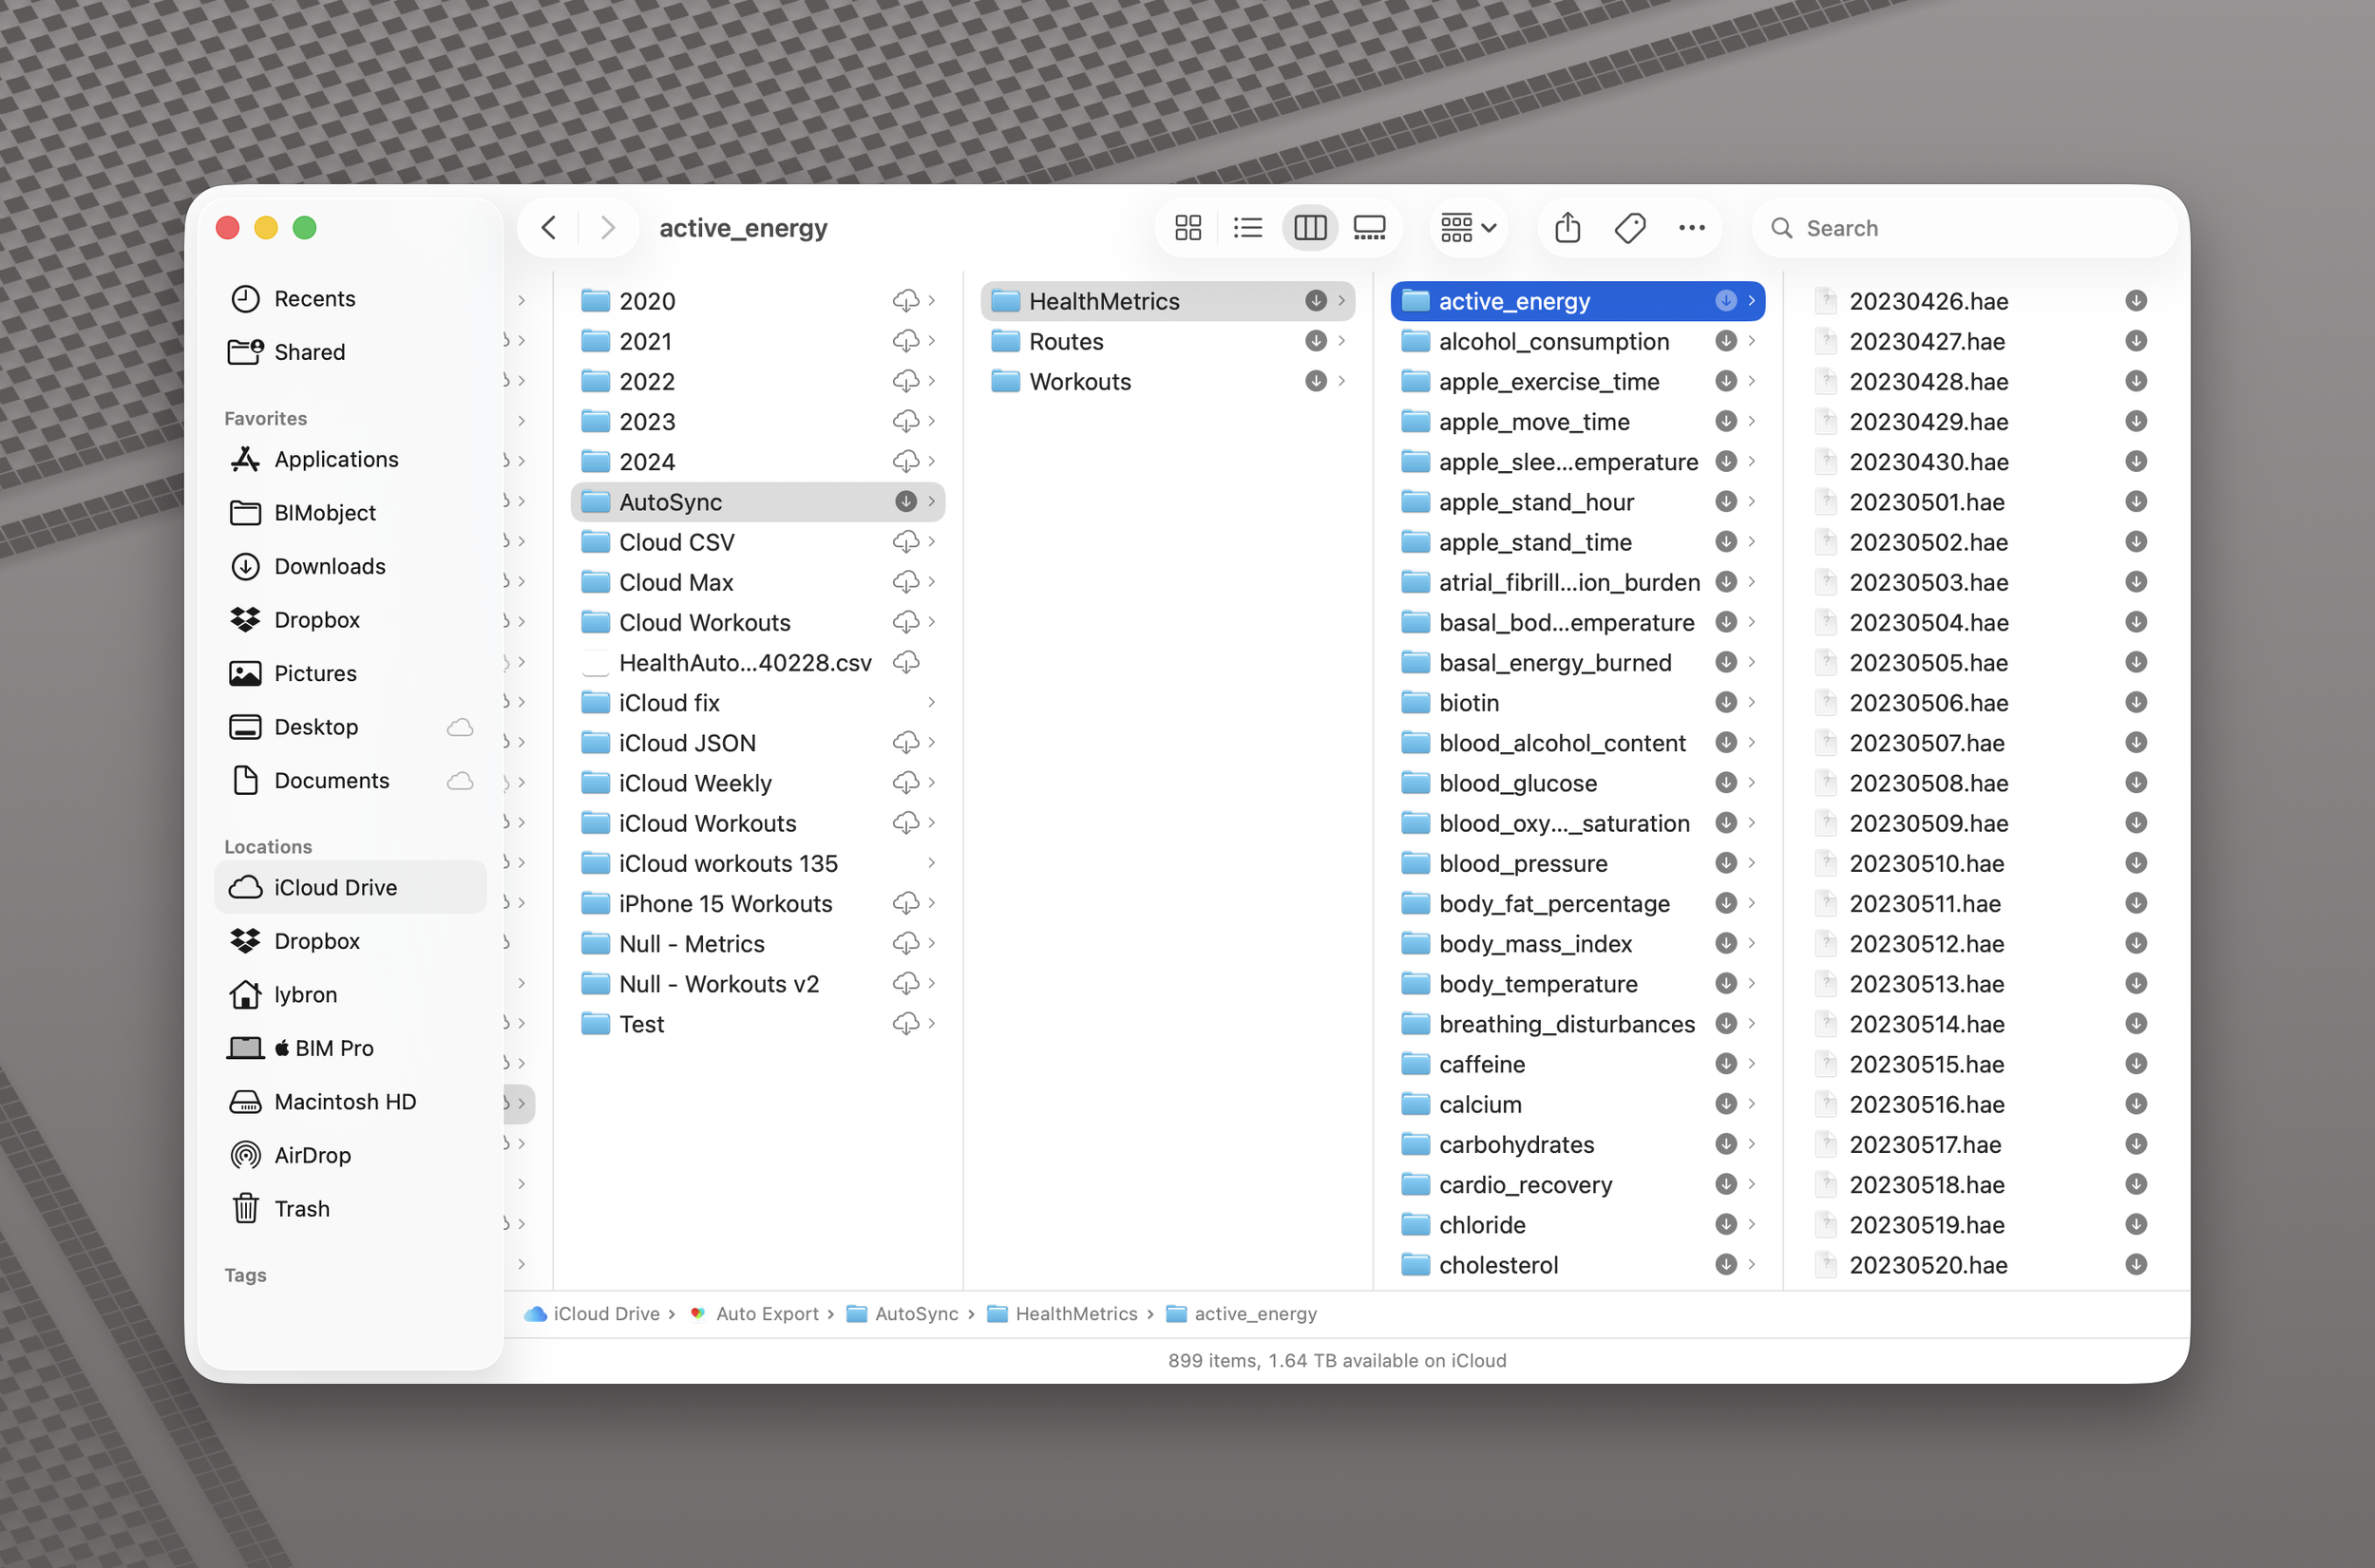
Follow the steps below that correspond to the points depicted in the image to ensure data has synced to your Mac before using the Health Auto Export for Mac:
First you will ensure the data was successfully transferred from iPhone and is downloaded to your Mac. The Auto Sync folder in iCloud Drive is depicted above.
Use Finder to navigate to the Auto Sync folder in iCloud Drive on your Mac. This will follow the hierarchy: iCloud Drive > Health Auto Export > Auto Sync.
You should see Health Metrics, Workouts or Routes folders that were generated by Health Auto Export for iPhone. In each folder you'll find any data that has been synced.
Right click on the Auto Sync folder referenced in Step 1. You will see the option to Keep Downloaded in the menu.
Select the option Keep Downloaded. macOS will now automatically download all data files uploaded by Health Auto Export on iPhone using Auto Sync.
Return to Health Auto Export on Mac to start viewing data. You may need to reload data or restart the application to see newly synced data.
Troubleshooting
If data is not syncing between devices, check the following criteria to ensure you are set up correctly.
You must be signed into the same iCloud account on your devices.
iCloud Drive must be enabled on all devices for Health Auto Export in iCloud settings section of the Settings app.
See how to enable iCloud Drive on your devices.
On iPhone, ensure you have granted read access to Apple Health.
See how to manage Apple Health data.
On iPhone, ensure you have Auto Sync enabled for health metrics and workouts.
If data is not visible on Mac after completing the steps above, try quitting then relaunching the app.
You must have Premium access to continue to sync data after the app trial period has ended.
Advanced Technical Support
Still need help? Contact support with any specific issues or questions you have.

